In this article, I’m gonna be showing you how to make a consistent character, not from photos but from scratch. I will show you how to create a character in Midjourney and go from one render to animation, and finally, a trained model, which then can be posed and placed in any environment.
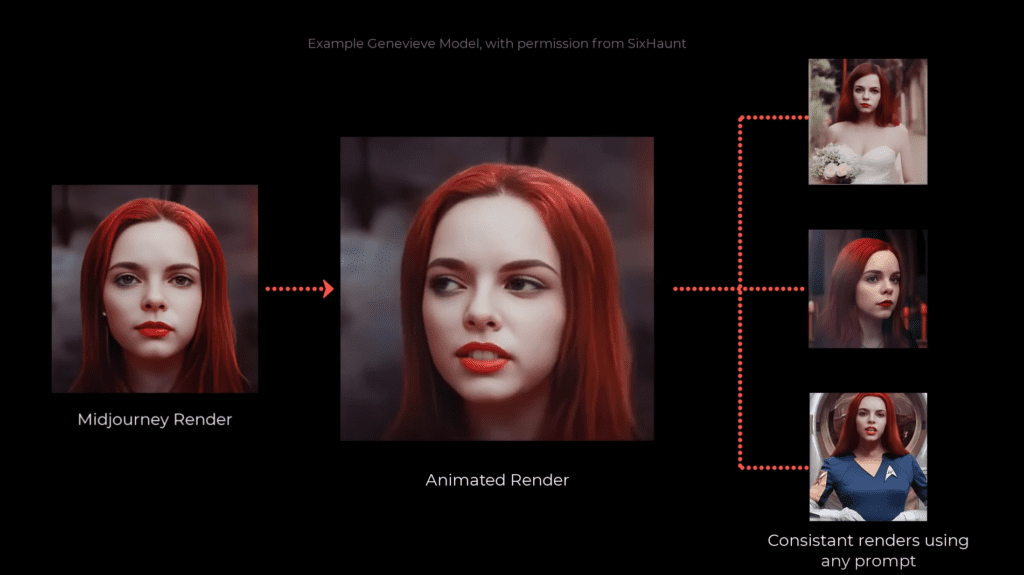
Creating your character
Step one is creating the face of our character. So the first thing I’m going to do is head over to Midjourney. Here we will just create a front perspective of our character, showing their features clearly.
Like any good design, it’s good to have a plan and idea of what you would the overall style of the character to be, to suit your narrative. I want to start with the front perspective of my character, this is important as we will animating her so will need a good clear image of her features.
My prompt is:
/imagine Head and shoulders shot of Instagram model, with orange long hair, hyper-detailed.
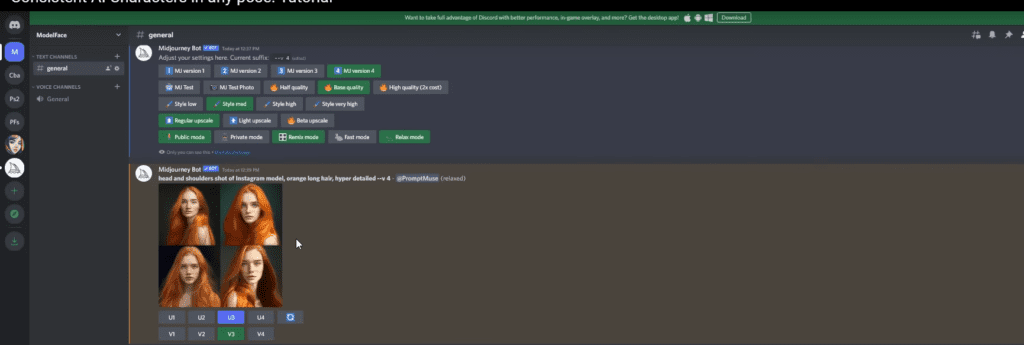
Midjourny will give me an option of 4 images to select from. I really like variation 3 (V3). I select U3 which will upscale my chosen image. Now I have the front perspective of my character, I click on the image and right click and save onto my PC. We are now complete with Midjounry.
Consistent facial perspectives
I will now concentrate on getting multiple frames of my character which will enable me to build a model and in turn prompt her in any situation, environment and in any pose. A AI model is a collection of images on a subject that is then trained by AI.
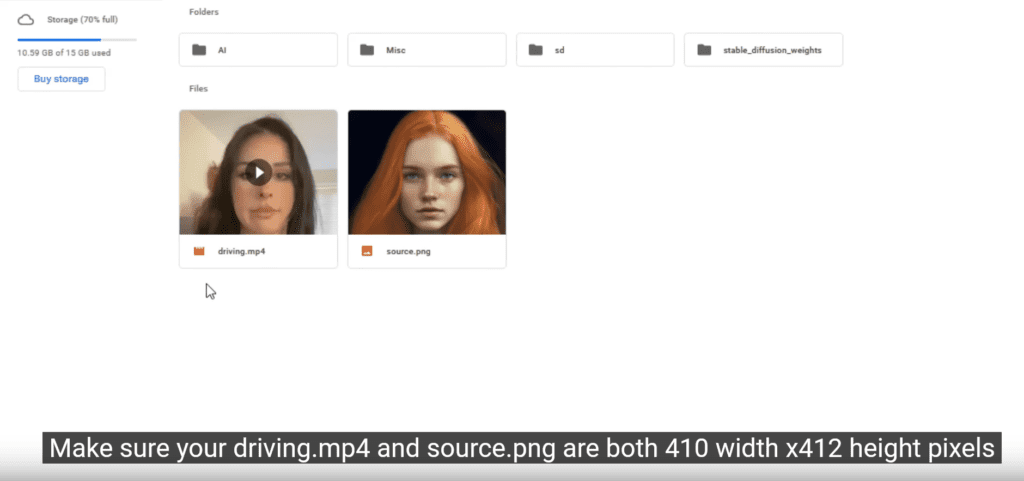
I create a MP4, just simply by recording myself on my phone, making an array of emotions, ensure I keep my face steady. The dimension of this video is 410×412 px I also take my midjourney image and save that as 410×412 px
It’s important that I create multiple images of my character with an array of emotions to feed into the training dataset. To do this I will take the MP4 I created and esentiall skin it with the source.png within the Thin Spline Plate Model.
I name the video driving. Mp4 and the image source.png and upload to my googledrive (Top level/not in a folder), so I can easily upload it into google collab Thin Spline plate model
Thin Spline Plate Model
I open the Thin spline plate model within google collab worksheet:
https://colab.research.google.com/drive/11pf0SkMIhz-d5Lo-m7XakXrgVHhycWg6?usp=sharing
I run each cell in the notebook, ensuring I have a green tick before I move on to the next cell.
It is vital that you mount your google drive (This is just a fancy way of saying connecting) As this is where we are pulling out mp4 and source images from. To do this, simply select the folder icon and then click on the Google drive folder to add the mounted drive to your notebook, Run this cell and log into your google drive.
Step1: Setup
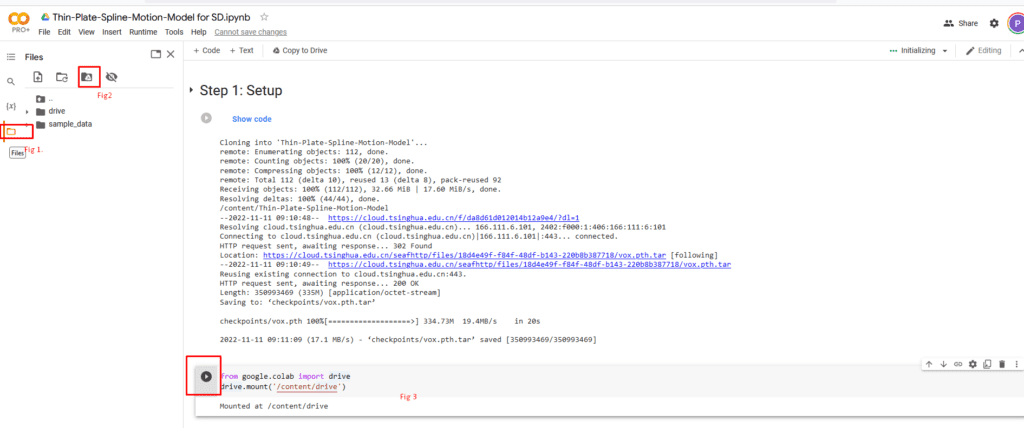
Step 2: Settings : Edit your source path: and driving video path to match the correct path to connect to your google drive.
You do this by locating your Gdrive from the left-hand folder hierarchy Content>drive>Mydrive. Find your Driving.mp4 video and next click on the 3 dots and select copy path. Simply now paste that path into the correct paths within Step 2. Once completed Run this Cell (Click play!)
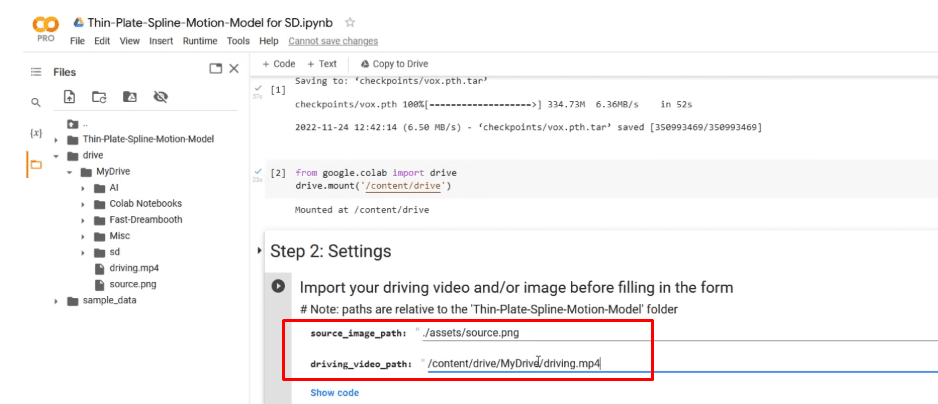
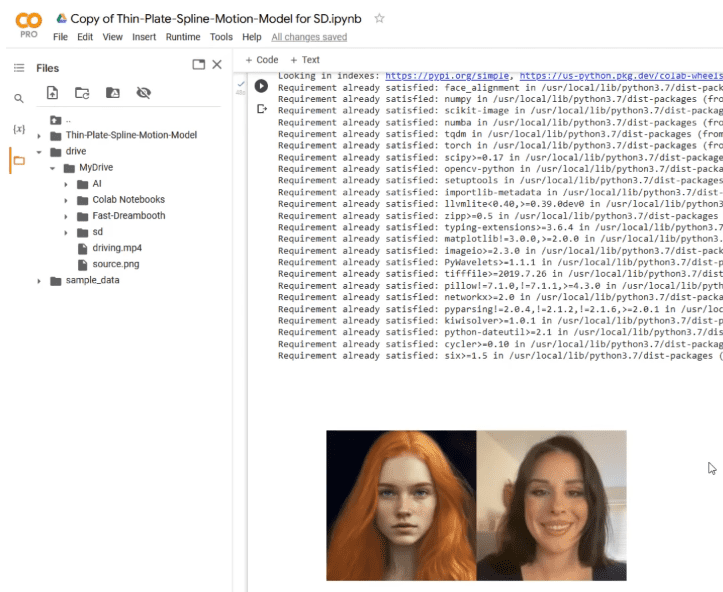
Okay, so here’s the magic. You can now see the source image of the driver video and your final result. And you can see the face is going a bit weird when you turn too fast. So don’t do that in your video! You can turn to a certain degree, but it starts screwing up when it goes to the side.
Step 3: Run Thin-Plate-Spline-Motion-Model
Once the previous step has given you a green tick, proceed to run step 3 cell (No addtional work required here!) This will autmatically create another folder in our folder structure over ont he right hand side. Once this video has finished being upscaled, we’re going to run it through something called Gspgan, and you might have heard of that before. It’s a facial restorer.
So we’re going to then split it into frames and then run it through there. And it should make the face a lot nicer, but it sounds like hard work. It isn’t. We’re just going to press Play on this and it’s going to do it for us. So we’re onto step five.
Step five is now going to divide your video up into frames, which will allow us to run it through the G FPG facial restorer on each frame. So I’m just going to hit five and you know what to do by now. So we’re just going to wait for that to split the files. You can see here in real time. It’s creating those files into the frames folder and you can see all those files being saved there at any time.
If you want to save an image or a video, you just go to these three little dots here and click on Download. And that will download it onto your computer. So that has now finished while I’ve been talking. And if we go down, we’re going to be now running it through the facial restorer, which will basically increase the resolution on the image and make the facial features more appealing. So I’m just going to hit play on that.
And then we’re nearly onto step seven, which is our last step, I promise. But it wasn’t that easy. It wasn’t too hard, I hope. And if you did have any red errors, any problems, just put down in the comments. We have now completed all seven steps and your final video is over here and it’s called Out MP4.
You’ve got all your frames as well, which you can download, and your fixed frames as well. I’m just going to click the three dots and then click Download, and then that will download this to my local computer. So I’m going to show you the results of this video. Mine’s not going to be very good because I know I don’t my head away too much in the video, but you can see our output. I’m now going to take these frames and train them in stable diffusion and create a model that I can use to make prompts and prompt this character into any place.
So these are the final frames that I’ve saved from my colab notebook, and I saved them locally on my machine. What I have done is just delete all the frames that are all the same and just kept some distinct frames of facial expressions that I could use to train stable diffusion with. So this is how we’re going to get a consistent character. You might be thinking, I don’t have any body shots, but we’re going to fix that in the next tutorial. We’re going to be using out painting to add a body onto this character.
Now, if you’re not too interested in doing the body, you can go ahead and skip the outpainting tutorial and go straight into training stable diffusion with me. So now what we are going to do is a bit of out painting. So we’ve got plenty of headshots of our character and what we want now is more of her physique or her body shots. And to do this, I’m going to be using out painting, which reimagines areas that are around your character using a prompt. So for this, there are many ways of doing this, but again, my computer is not powerful enough at the moment to run it locally on my machine.
So I’m going to be using Google Collabs. If you go in the link below, you will see the Stable Diffusion Infinity collab link. So if you click on that, this screen is what you will see. And I’ve already run all my cells here, so I’ve pressed play on each one. But if you just start the setup and click Play, and that will install all the files remotely to the left hand side of this file area over here.
And then once that’s complete, then go to the setup of Stable Diffusion infinity so step three will continuously run. So it’s going to continuously run in the background. And what you’re looking for is when it’s loaded, you will see running on public URL. So we’re going to take that one, not the local URL because that means we’re using our machine’s GPU and I want to use the remote GPU. So I’m going to just copy the running on public URL and copy and paste that into your browser.
So when you’ve copied and pasted that link into your browser, you will get this screen here and all you need to do is get your hugging face token. Hugging Face Token is a unique identifying key to yourself. So we just go to the hugging face website and if you don’t know how to get to this page, just simply go to Settings. And then here on the left, click on Access Tokens. Super simple.
And click on New Token. And this will create you a new token or a key or whatever you want to call it and just give it some name that has some reference to whatever you’re working in. I’m just going to call my Infinity because I can’t sell infinity. And then I’m going to click on Copy and then go back to Stabledfusion Infinity and paste my token in that section. Now, I’m just going to select the stable diffusion in painting.
You can have the in painting an image image, but I’m just going to use In Painting for now and that’s it. And just click to set up. And this will now load your interface up. So now you will see a screen like this if you’re successful. And this is really, really simple to use.
So if you go to upload image, I’m just going to upload just any image of my woman’s face. Just scale it down slightly and I’m going to make sure enable Safety checker is off because that’s not safe for work checker. Basically, if you’re showing any nudeness, it will vendor a black box and we don’t want that. So for some reason when you’re doing a woman’s body, even if she’s not nude, it will flag it up. So uncheck that and you can do not say for work images or what it regards not safe as work images.
Once you’ve placed her in a position on the canvas you’re happy with just click Confirm and that’s what sets her into place. And you’ve got a prompt to a woman in green top. I don’t know if that’s a very good prompt, probably not. You can actually interrogate the image and it will give you what it thinks the image is. You can then adjust that prompt to be a bit more stronger.
But for now, I’m just going to set it as that. My sample size is six, my strength is zero. I’m going to put zero seven. My mode is CV Two underscore NS. Everything looks good and I’m going to just click the output button.
And this starts rendering the output. So you can see the processing bar down here and you can also switch back to Google collabs. And if you go to the bottom, because I’ve been working on this, you can see the percentage bar there as well. So that’s why that’s continuously executing in the background because it’s basically running this interface that you can see here. So as you can see, it’s giving me the woman in a green top, some sort of weird white thing there, but you can just paint that out.
I’m going to click Accept on that. You can cancel or run a retry. Remember, this is absolutely free. So you can just retry as many times as you like that you can move this generation frame around the screen to create more out paintings if you wanted to put her shoulder in or hair on top of the head. And once you’ve finished, you can then just go to Export Image here and then export your image as whatever you want.
And that saves it locally to your downloads folder. That’s a really cool way of getting the body. So once you’re happy with the set of images you’ve got for training this is mine. It’s not quite a good collection, but I’m trying to film this tutorial at the same time as doing this. So hopefully yours will fare better than mine.
We are going to now head over to a new notebook. This is a Dream booth, stable diffusion, and the link is down below. So we’re going to be using this notebook to train a model on our images that we’ve created. So everything has led up to this point. So what we want to do, you should be used to this environment.
Now we’re just going to cheque the type of GPU and VRAM and yep, I’ve got Tesla TV Four I’m running remotely at the moment. And then I’m just going to install this. So we just need to log back into our hugging Faith account and go to Settings and then access tokens and then want to create a new token. I’ll call this Dream and then generate the token copy that you’ve done this before, so it should be easy. And then paste that token into your hugging face token area and hit run on that cell.
Okay. And then we’re going to just install these XFORM moves here. I would say this to my Google Drive, but I don’t actually have enough space at the moment. This is the model you are running. We’re actually on two now, overnight, or yesterday we went into version two, but I’m going to keep it on version one here.
You can change that path if you want to use another version. And the output directory, so that will be up here. That will create the directory here. I’m just going to keep it to the WX, but you can call it Redhead Lady or whatever the name project is. I’m just going to leave mine as default for this demonstration.
Okay, so there’s some sections here we want to change. So our lady is not a dog, I’m going to name her a person and photo of a person.
OK, so we’re just going to run the sell here and that will create our folders that we’re going to just drag our images into. So if we go to the file directory, we should have a new folder oops into data, sorry, and ZWX. And that’s where I’m going to drag my training data into, which is all the images we’ve created. So I’m just dragging these locally off my machine and just throwing them in and uploading them and that’s just a message saying once the runtime is finished, it will delete the images, which is fine if you read this one you can upload from your computer. But as we frame them into the file, we don’t need to do that.
So we can then just go to the next so just run this one, but I need to change that to person, not dog. And I’m going to keep all these settings as the same and then just run that cell. That last cell took a rather long time, so I hope you made yourself comfortable while that was running. So we’re now moving on to the weight cell. I’m not going to change that, so I’m going to keep that as it is.
I’m not going to run the grid. So this next section is what we’re going to do at the end. This is converting the weights to a CKPT package or model to use in web UIs like automatic one one. So that’s basically going to be our output that we’re going to load into our local stable diffusion to write our prompts. You can use this notebook to do that in, but you can do it locally on your machine, which is a lot easier and a lot better than doing in here.
But that is going to be our output. We’re not going to run that cell just yet. We can do that at the end. The next section we have is the inference. So I’m going to run that.
And these cells now from now on are a lot quicker than any of the ones above. Okay? So after inference, we are going to the sea. So you can set random seed here for reproducibility. I’m just going to press play.
Okay, so photo of ZW x in a dog in a bucket, that’s not what we’re creating. We’re just going to do ZWX face is that what my prompt was, which is a photo of a person. So ours is the WX person. So negative prompt is for example, if you want the person to have long hair, you’d put negative prompt in short hair, so it avoids short hair in any of the images. I’m not going to do anything for that at the moment.
Number of stance pulls. I’m going to keep it four guidance scale. You can lower that, but I’m going to keep my 10.5 and fahrenheit. Yeah, so I’m just happy with all those settings. So I’m going to run and see what this gives me.
Hopefully this works after all that. So this is pretty speedy. So it should give me somebody who looks like my Redhead model that I created in mid journey. There you go. There she is.
So she really looks like my training images, which is great. So if I go to my data and go to my ZWX and open Redhead, we can compare our training. Oh, that’s not a good thing. Let’s get a better one. There we go.
We can see our training data compared to what we’re getting, which is really good. It’s a really strong likeness, and now we can go up and save that model. So if we now go back up to convert weights to CKPT to use in the web UIs, we can now save this as a model to load into our local stable diffusion installation. If you have got that, if you haven’t got that on your machine and have more than 4GB of VRAM, you can run it. If you have less than that, I wouldn’t even try.
I’m doing a new video on installation of Stable Diffusion 2.0, because that has just come out overnight, so I’m very excited to do that. So the video will appear here once it’s done. If it’s not there, please badger me in the comments for that because I need to update mine and see the difference. So I’ve got to test that. So that now has saved my file, and it tells you, here the path it saved it to.
So let’s find that. Here we go. Up one level and into contents and model stable diffusion weights, the WX 800. And there she is, model CKPT. I am literally losing the ability to talk, so I’m just going to download that and I’ll show you how to save that into your local stable diffusion.
Sorry, I’ve gone completely nuts. So, yeah, we have now got our trained character. So here’s a few more prompts that I put in. So you can see sometimes it gives you a bit of a crazy image. And there you go.
She’s holding a glass of wine. So compared to the training image, you can see it’s got really good likeness. And now I’ve done photo of ZW, ex person, cyberpunk style. And as you can see against the training images there. So the CKPT file is going to take a while to download.
It’s a couple of gigabytes, but once it’s downloaded and you have stable diffusion locally installed on your PC, just go to that file where your stable diffusion lives, and then go to Models and Stable Diffusion, and then just put the CKPT file in here along with all the others. And then if you just go back up like this and click on Web user to launch your Stable Diffusion you have downloaded your CKPT file and put it into the Stable Diffusion Models folder. You should be able to see it in the dropdown list here that this is Mine. Here something very important. Now, when you are prompting your character, you need to write the name that you wrote in the instance when you were training your character within Dream Booth.
So for Mine, I trained Mine on being a person right at the beginning and then scroll back at the tutorial. And the name was ZWH. I think it was just left as the default. So her name is ZWS and she is a person. So I can change the beginning and end of this sentence, but I just have to always ensure that I indicate it’s ZWX person to get the strongest likeness to my trained character.
So now you can make any image you like of your character. You can make her into a comic strip, you can make her into a painting, you can make her into an Instagram model. Whatever you want to do, make sure it’s legal and completely above boards. And this is it. You’ve done it.
And as always, that will do it. Hit that notification button and subscribe everyone like. Thank you. Bye.


1 Comment
So helpful and mind blowing. I’m really looking forward to creating my own AI characters. Thank you